Showing posts with label how-to. Show all posts

Installing Jena TDB and Joseki on Ubuntu Server?

Background


I had been trying to install Jena TDB and Joseki on Ubuntu Server for 3 days and finally it succeeded. I was writing this article to share my experience with the World. I hope it will help ones who are doing similar things. In case that you don't know what they are, Jena is a Java library to parse and manipulate RDF data. Jena TDB is an RDF storage without using a database. Joseki is a SPARQL server that enables us to use SPARQL over http.

Thanks to Ric Roberts. His article on Jena and Joseki saved my life. The article you are going to read below is an extension to his Jena article.

Note: I setup my Ubuntu Server on VirtualBox but my instructions should work on a real server too.

XC to LOM Mapping

dcterms:identifier 1.1.2: /lom/general/identifier/entry
dcterms:title 1.2: /lom/general/title
dcterms:language 1.3: /lom/general/language
dcterms:description 1.4: /lom/general/description
dcterms:subject 1.5: /lom/general/keyword or 9: /lom/classification with 9.1: /lom/classification/purpose equals "discipline" or "idea".
dcterms:coverage 1.6: /lom/general/coverage
dcterms:type 5.2: /lom/educational/learningResourceType
dcterms:date 2.3.3: /lom/lifeCycle/contribute/date when 2.3.1: /lom/lifeCycle/contribute/role has a value of "publisher".
dcterms:creator 2.3.2: /lom/lifeCycle/contribute/entity when 2.3.1: /lom/lifeCycle/contribute/role has a value of "author".
dcterms:otherContributor 2.3.2: /lom/lifeCycle/contribute/entity with the type of contribution specified in 2.3.1: /lom/lifeCycle/contribute/role
dcterms:publisher 2.3.2: /lom/lifeCycle/contribute/entity when 2.3.1: /lom/lifeCycle/contribute/role has a value of "publisher".
dcterms:format 4.1: /lom/technical/format
dcterms:rights 6.3: /lom/rights/description
dcterms:relation 7.2.2: /lom/relation/resource/description
dcterms:source 7.2: /lom/relation/resource when the value of 7.1: /lom/relation/kind is "isBasedOn".

Workaround for Google base "Missing required attribute: condition" for eBay feed

Problem

As the Google base has required condition attribute since June 30, sellers cannot upload their eBay store feed to it. It will give an error "Missing required attribute: condition".

Cause

There is no <g:condition> attribute in the eBay feed.

Solution

A. Download the xml file with your store listings:
Download your store feed and save as an xml file
http://esssl.ebay.com/GetListings/yourstorename?fmt=g

or

1. go to My eBay -> Manage my store
2. on the left Marketing tool menu, click Listing feeds
3. Find the line

Your Google Base-specific file will be located at http://esssl.ebay.com/GetListings/your_store_name?fmt=g

4. right click on the link and select 'save link as' or (save target as in IE) then change the extension of the file to .xml instead of .htm and save it to your computer.


B. Edit the downloaded XML file
1. Right click on the downloaded XML file and select "Open With" then select Notepad.
2. In Notepad, press Ctrl-H to open the find & replace box. Enter "condition>" in the find field and "g:condition>" in the replace field (exclude the quotation marks). Click Replace all.
3. Save the file with File --> Save.

This section is not done yet because
the "g:condition" attribute the only acceptable values are "new", "used" and "refurbished." but eBay values can be "used", "pre-owned", "like new", "very good", "good", "acceptable", "see description" etc.

You have to replace all of the incompatible values with either
"new", "used" and "refurbished." otherwise you cannot insert the items with incompatible attribute into Google Base.

Suppose I want to replace all "see description" as "new". I would press
Ctrl-H to open the find & replace box. Enter "<g:condition><!--[CDATA[see description]]--></g:condition>" in the find field and "<g:condition><!--[CDATA[new]]--></g:condition>" in the replace field (exclude the quotation marks). Then click Replace all.

C. Upload your edited XML file to Google
1. Login to your existing Google Base account.
2. Click tab "Data Feeds"
3. Click link "Manual: Upload File"
4. Point Google to the XML file that you have edited it in B.


Now you should see no error :)

If you think this article is helpful, please kindly buy me a cup of coffee :)


Best,
Nopash

Visit my eBay store at www.eDecalShop.com

Get more from Gmail address with Gmail Aliases

With your Gmail address, you can get more greater control over your inbox and save your some time and headache. Here are two different ways you can modify your Gmail address and still get your mail:

  • Append a plus (“+”) sign and any combination of words or numbers after your email address. For example, if your name was hikingfan@gmail.com, you could send mail to hikingfan+friends@gmail.com or hikingfan+mailinglists@gmail.com.
  • Insert one or several dots (“.”) anywhere in your email address. Gmail doesn't recognize periods as characters in addresses -- we just ignore them. For example, you could tell people your address was hikingfan@gmail.com, hiking.fan@gmail.com or hi.kin.g.fan@gmail.com. (We understand that there has been some confusion about this in the past, but to settle it once and for all, you can indeed receive mail at all the variations with dots.)

For example you could use hikingfan+bank@gmail.com, when you sign up for online banking and then set up a filter to automatically star, archive or label emails addressed to hikingfan+bank. You can also use this when you register for a service and think they might share your information. For example, I added "+donation" when I gave money to a political organization once, and now when I see emails from other groups to that address, I know how they got it. Solution: filtered to auto-delete.

Find out who gives away your email address with Gmail trick

When you give your email address to a website, you hope that they don't sell or trade your address to a bunch of spammers. Well if they do, here is a simple way to see what sites are responsible for what particular piece of email. This requires you have a Gmail account.

If your Gmail login name was username@gmail.com and you went to samplesite.com to fill out a registration form, instead of just entering username@gmail.com as your email, enter it as username+samplesitecom@gmail.com instead. When Gmail sees a "+" in an email address, it uses all the characters to the left of the plus sign to know who to send it to. In this example it would still send it to username@gmail.com.

Now whats cool is if you search Gmail for username+samplesitecom, you will see all massages that were sent to that email address.

To see who is responsible for sending a specific message click the Show Details link and you will see the complete address.

info:http://www.ditii.com

Gmail login access URLs

Gmail login access URLs:
  1. http://www.gmail.com/ – The public Gmail domain which is for universal access on PC or mobile device. Although the page is non-SSL, the login process is secured.
  2. https://www.gmail.com/ – The Gmail SSL universal login page for computer or mobile browsers.
  3. http://mail.google.com/mail/ – Gmail canonical URI which is the URI you most likely to see after login to Gmail webmail interface. This URL can be used on PC as well as portable mobile phone devices. It becomes simple HTML mode depending on the browser used to access it.
  4. https: //mail.google.com/mail/ – Same as above, but the secure SSL version.
  5. http://gmail.google.com/gmail/ – Old canonical URI.
  6. https://gmail.google.com/gmail/ – Old canonical secure SSL URI.
  7. https://mail.google.com/mail/?nocheckbrowser – Force Gmail to load in standard interface without checking for the type of web browser. Normally Gmail will check for supported browser, and if none is found, it will automatically load with simple Basic HTML interface mode.
  8. http://gmail.google.com/gmail?nocheckbrowser – Old URI or link location of the above.
  9. https://mail.google.com/mail/?nochat – Force Gmail to load in Standard Gmail interface without chat services.
  10. https://gmail.google.com/gmail/?nochat – Old URL of the above.
  11. http://mail.google.com/mail/h/ – Simple or Basic HTML mode.
  12. https://mail.google.com/mail/h/ – Secure SSL Gmail webmail that automatically load into Basic HTML interface.
  13. http://m.gmail.com – Link for Gmail Mobile interface optimized for portable wireless phone devices or PDA.
  14. http://mail.google.com/mail/x/ – Another link URL for mobile wireless devices.
  15. https://mail.google.com/mail/x/ – Secure SSL edition of the above link.
  16. https://mail.google.com/mail/feed/atom/ – Gmail inbox feed URL for reading with Atom Feed or RSS reader.
  17. Gmail for mobile devices or mobile phones – A Java client app that downloaded to mobile devices and provides advance Gmail user interface, synchronization of emails in mailboxes, and ability to view attachments such as photos, documents and .pdf files.
  18. Gmail also allows POP3 and SMTP access by using desktop email clients.

วิธีแก้ "ATI Catalyst Install Manager has stopped working"

เมื่อวันก่อนผมได้ Update ผ่าน System Update ครับ ปรากฎว่ามี Driver ของ ATI ตัวใหม่เข้ามาสำหรับ
- ThinkPad R400
- ThinkPad T400, T500
- ThinkPad W500
ชื่อเต็มๆของมันก็คือ ThinkPad Switchable Graphics Driver for Windows Vista 32bit and 64bit - ThinkPad T400, R400, T500, W500 ครับ
ขนาดไฟล์ 143MB
เนื่องจาก Lenovo System Update มัน Download ได้เฉี่อยมากๆๆๆ ผมเรยไปโหลดมาจากตัวแม่เรยครับที่

เข้าไปแล้วโหลดตัว
7vd537ww.exe       150,310,720       ThinkPad Switchable Graphics Driver

จากนั้นให้ Double clicks ที่ไฟล์ที่โหลดมา เครื่องจะ extract file download ไปไว้ที่ C:\Drivers\win\video

ตามเข้า Folder นั้นไปเรยครับ แล้วลอง Double Clicks ที่ Setup.exe

มันก็จะขึ้นว่าให้ปิดโปรแกรมทุกอย่างก่อนครับ หลังจากนั้นมันจะมีให้เลือกว่า Install หรือ Uninstall พอผมกด Install(หรือ Uninstall).......
มีหน้าต่างขึ้นว่า

"ATI Catalyst Install Manager has stopped working"

อ่าว ซวยล่ะสิ ลองใหม่อีกทีก็ไม่ได้ ส่วนตัวผมก็เคยได้ยินว่าการอัพ Driver ATI เป็นเรื่องยุ่งยากเหมือนกัน จากนั้นผมก็เข้าห้องสมุดไปค้นคว้า มันมีวิธีแก้ 2 วิธีครับ

วิธีที่ 1
    
ลบทุกอย่างที่เกี่ยวกับ ATI บนเครื่องไปให้หมด รวมไปถึงใน Registry ด้วย ใช้โปรแกรม "Windows Install Clean up" กับ CCleaner ช่วยในการ uninstall จากนั้นลองกด setup.exe ใหม่ครับ ถ้าลบหมดจดจริงๆ จะสามารถติดตั้งได้นะครับ


วิธีที่ 2 (แนะนำ)

วิธีนี้ง่ายมากๆๆๆ ผมไปพบจาก Blog ของชาวรัสเซียท่านหนึ่ง (http://pitjunja.livejournal.com/26898.html) โดยบังเอิญครับ เค้าบอกวิธีแก้มาดังนี้

1. ท่านต้องเป็น admin ของเครื่อง
2. run -> cmd
3. ไปที่ ATI Driver folder ที่ถูก extract มาครับ (ของผมอยู่ที่ C:\Drivers\win\video)
4. เข้าไปที่ folder bin (C:\Drivers\win\video>cd Bin)
5. พิมพ์ตามนี้ครับ

C:\Drivers\win\video\Bin>atisetup.exe -Install -Output screen

ถ้าทุกอย่างผ่านไปด้วยดี Driver ATI เจ้าปัญหาจะลงได้ครับ อย่าลืม Restart เครื่องด้วยเน้อ

Happy New Year ครับ

ปรับแต่ง about:config ของ Mozilla FireFox 3 ให้แรงๆ กันเถอะ

ปรับตามนี้รับรอง FireFox ของท่านจะเข้าเปิดเว็บได้เร็วขึ้นครับ บทความนี้มีเก็บไว้ในเครื่องนานแล้วครับ จำไม่ได้ว่าเอามาจากที่ใดเหมือนกันครับ จริงๆแล้วบทความนี้อ้างถึงการปรับแต่ง FireFox 1.5 ครับ แต่ version ปัจจุบันก็ยังคงใช้ได้อยู่ครับ


พิมพ์ about:config ที่ช่อง address bar แล้วกด enter จะเข้ามายังหน้าแบบรูปข้างบนครับ

วิธีการปรับแต่งคือให้ใส่ตัวแปรต่อไปนี้ ในช่อง Filter จากนั้นเมื่อ Firefox แสดงผลตัวแปรนั้นๆ ก็ให้ดับเบิ้ลคลิก แล้วแก้ไขเป็นค่าที่ต้องการ

general.useragent.locale
ถ้าเป็น en-US ให้แก้เป็น th-TH

network.http.max-connections
แก้เป็น 64 [แต่เดิมเป็น 24 ]

network.http.max-connections-per-server
แก้เป็น 20 [แต่เดิมเป็น 8 ]

network.http.max-persistent-connections-per-proxy
แก้เป็น 10 [แต่เดิมเป็น 4 ]

network.http.max-persistent-connections-per-server
แก้เป็น 10 [แต่เดิมเป็น 2 ]

network.http.pipelining.maxrequests
แก้เป็น 200 [แต่เดิมเป็น 4 ]

network.http.request.max-start-delay
แก้เป็น 0 [แต่เดิมเป็น 10 ]

network.http.proxy.pipelining
แก้เป็น true [แต่เดิมเป็น false]

network.http.proxy.version
แก้เป็น 1.0 [แต่เดิมเป็น 1.1 ]

คลิกขวาที่ว่าง เลือก integer
1.ใส่ตัวแปร nglayout.initialpaint.delay
2.ใส่ค่าเป็น 0

browser.sessionhistory.max_total_viewers
ให้ใส่ตามปริมาณจำนวนแรมในเครื่อง เพื่อไม่ให้การเก็บ cache ในประวัติมีมากเกินไป ซึ่งอาจจะส่งผลให้ไฟร์ฟอกซ์กินแรมเยอะเกินไป
32 MB ให้ใส่ 0
64 MB ให้ใส่ 1
128 MB ให้ใส่ 2
256 MB ให้ใส่ 3
512 MB ให้ใส่ 5
มากกว่านี้ ให้ใส่ 8
ให้ใส่ 8 ได้มากที่สุดเท่านั้น ถ้าใส่มากกว่านี้ไฟร์ฟอกซ์จะปิดการเก็บ cache

คลิกขวาที่ว่าง เลือก Boolean
1.ใส่ตัวแปร config.trim_on_minimize
2.เลือกค่าเป็น True

คลิกขวาที่ว่าง เลือก Integer
1.ใส่ตัวแปร Browser.cache.memory.capacity
2.เลือกค่าโดยแปรผันตามจำนวนแรมข้างล่าง

network.dns.disableIPv6
แก้เป็น true [แต่เดิมเป็น false]

เสร็จแล้วก็ปิด FireFox แล้วเปิดใหม่ครับ คุณจะรู้สึกถึงความแตกต่าง อ่อ ส่วน Plug-in FasterFox ไม่ต้องไปลงมันนะครับ เพราะมันจะแอบโหลดเพจจากลิ้งค์ในหน้าที่คุณเปิดอยู่ กิน Bandwidth ครับ

ขอให้ทุกท่านมีความสุขครับ

Google Talk chatback badge!

ใครใช้ Google Talk หรือ Google chat บน GMail สามารถบอกสถานะของคุณได้นะครับ คล้ายกับ "i'm online" ของ Skype.
ตัวอย่างของ Google Badge ก็ใต้รูปผมทางด้านขวามือเรยครับ

คุณสามารถ create bagde ของตัวเองได้ที่

http://www.google.com/talk/service/badge/New

เอาไปแปะใน eBay listing หรือใน blog ของคุณจะมีประโยชน์มากครับ

ขอให้ทุกท่านมีความสุขครับ

วิธีถอนเงินจาก eBay แบบไม่โดน PayPal กด exchange rate ครับ

ตามปกติแล้วเวลาผู้ขาย eBay ถอนเงิน จะต้องใส่บัญชีธนาคารของประเทศไทยใช่ไหมครับผม แล้วตอนถอน PayPal จะคำนวณอัตราแลกเปลี่ยนให้เรา ซึ่งถูกกว่าความเป็นจริงครับ ประมาณ 1-2 บาทได้ (เยอะนะครับ ถ้าท่านถอนเงินเป็น $1,000) แต่วิธีนี้ไม่เสียค่าดำเนินการครับ (ยกเว้นที่ PayPal มันแอบกินไปตอนแลกเปลี่ยน) ถ้าคุณถอนออกมาเป็นเงินมากกว่า 5,000 บาท

ถือว่าเป็นโชคดีของคนไทยครับที่ Bangkok Bank มีสาขาที่ New York เราสามารถขอให้ PayPal โอนเงินมาที่ประเทศไทยโดยผ่าน Bangkok Bank สาขา New York ได้ครับ โดยจะใช้เวลาโอนเงินประมาณ 4-5 วันและได้อัตราแลกเปลี่ยนตามธนาคารกรุงเทพของประเทศไทยครับผม

วิธีการก็ตามนี้เรยครับ

1. คุณต้องมีบัญชีธนาคารกรุงเทพของประเทศไทยก่อนนะครับ เปิดแบบออมทรัพย์นะครับ
2. ไปที่ http://www.PayPal.com ครับแล้ว Sign in ด้วย account ของคุณ
3. ไปที่ แถบ My Account ครับ (ปกติเข้ามาก็จะอยู่ที่นี่อยู่แล้ว)
4. ข้างล่างจะมี submenu ไปที่ Profile -> Add/Edit Bank Account
5. คลิกปุ่ม Add
6. Country: United States
7. Bank Name: Bangkok Bank
8. Account Type: Savings
9. Routing Number: 026008691
10. Account Number: เลขที่บัญชีของคุณครับ ไม่ต้องวรรคหรือใส่ - คั่นนะครับ
11. Re-enter Account Number: ก็ใส่ไปอีกครั้ง
12. กด Continue ครับ

ทีนี้คุณก็เพิ่มบัญชีธนาคารเข้าไปแล้วนะครับ แต่ยังไม่เสร็จครับ ต้อง verify bank account ก่อน

วิธี Verify Bank Account นะครับ

1. กลับมาที่หน้าหลักโดยคลิกที่ My Account แท็บด้านบนครับ
2. คุณจะเห็น To-do list ครับบอกว่าให้ verify bank account ครับ
3. กดเข้าไปจะมี 2 บล็อคให้กรอกครับ ทาง PayPal จะทำการฝากเงินเป็นจำนวนเล็กๆ 2 จำนวนเข้ามาที่บัญชีธนาคารของเราครับ ให้รอสัก 3-4 วัน แล้วโทรถามธนาคารกรุงเทพเบอร์ 1333 แล้วถามเค้าว่ามีเงินฝากเข้ามาจากต่างประเทศหรือเปล่า
4. เจ้าหน้าที่อาจจะบอกเป็นจำนวนเงินบาทครับ ให้สอบถามว่าเป็นกี่ US Dollars (ของวันที่ฝากเข้า)นะครับ
5. แล้วนำเอาเลขสองจำนวนที่เป็น US Dollars แล้วไปใส่ใน 2 บล็อคนั่นแหละครับ เช่น $0.21 กับ $0.18 ก็ใส่ 21 กับ 18 ครับ เป็นอันเสร็จสิ้นกระบวนการ
ุ6. หากกรอกผิด 3 ครั้ง Account จะถูกล็อคนะครับ ระวังด้วย

ขอให้ทุกท่านร่ำรวยครับ :)

A Better way to apply convolution mask in MATLAB

Set up an array and a mask. This assumes that you have the Sussex vision library in your Matlab path.

The mask is 3x3, but the methods below will work whatever the size and shape of the mask.

Input = teachimage('image path');
imshow(Input);
Mask = [2 1 0; 1 0 -1; 0 -1 -2] % a diagonal edge detection mask

is equivalent to
Mask =

2 1 0
1 0 -1
0 -1 -2

% apply the mask is easier than the last post
Output = conv2(Input, Mask, 'valid');

imshow(Output);


(Adopt from http://www.cogs.susx.ac.uk/users/davidy/compvis/matlab_demos/convolution_demo.html)

Example of applying a mask on an image using MATLAB (Convolution)

Supposing that we will apply

Blur kernel


on an image.


%read an image and assign to a variable
Input = imread('image path');

%convert image to grayscale
Input = rgb2gray(Input);

%get size of the image
[r,c] = size(Input);

Output = Input;

%apply the filter
for i=2:r-1
for j=2:c-1
Output(i,j) = Input(i-1,j-1)*1/9 +
Input(i-1,j)*1/9 + Input(i-1,j+1)*1/9 + Input(i,j-1)*1/9 + Input(i,j)*1/9 + Input(i,j+1)*1/9 + Input(i+1,j-1)*1/9 + Input(i+1,j)*1/9 + Input(i+1,j+1)*1/9;
end
end

figure, imshow(Input)
figure, imshow(Output)


This is the not-yet-test script. Please leave me a message if it doesn't work :)

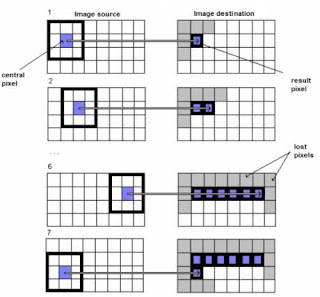
This is an illustration on how the algorithm works


Applying a 3x3 Matrix Convolution: Matrix convolutions work by averaging pixel colors with those of surrounding pixels using this process.

(source from www.devx.com/webdev/Article/37179/0/page/7)
Related Posts Plugin for WordPress, Blogger...